DHCP and DNS Server Configuration
Overview
This lab demonstrates how to set up a fully functional DHCP and DNS environment within an Active Directory infrastructure using Windows Server. The process involves installing the DHCP and DNS Server roles, configuring a DHCP IPv4 scope to automatically assign IP addresses to client machines, and verifying domain resolution using DNS. A domain controller named lab.local is used to manage network resources, and a Windows client is configured to test IP lease and DNS resolution. This setup simulates a real-world enterprise environment where centralized network services are critical for device provisioning and name resolution.
| Skills Demonstrated |
|---|
| Installing and configuring DHCP and DNS server roles |
| Creating a DHCP IPv4 address scope with default gateway and DNS settings |
| Promoting a server to a domain controller using AD DS |
| Creating and managing domain user accounts |
| Verifying A records in a forward lookup zone using DNS Manager |
| Configuring Windows client to automatically receive IP and DNS settings |
| Performing DNS resolution tests to verify name-to-IP mapping |
| Understanding how DHCP and DNS integrate into a real-world domain environment |
| Tools Used |
|---|
| Windows Server (Active Directory Domain Services, DHCP, DNS) |
| Windows 10 Client VM |
| DHCP Manager (dhcpmgmt.msc) |
| DNS Manager |
| Active Directory Users and Computers (dsa.msc) |
| Server Manager – Roles and Features Wizard |
| Command Prompt (ipconfig, ping) |
1. Environment Setup
- Installed a Windows Server VM
- Created a local Administrator account
- Installed Active Directory Domain Services (AD DS)
- Promoted the server to a Domain Controller with the domain name:
lab.local

2. User Creation
- In Active Directory Users and Computers, created a domain user:
- Name: John Doe
- Logon Name:
j.doe

3. Install DHCP and DNS Roles
- Opened Server Manager > Add Roles and Features
- Installed:
- DHCP Server
- DNS Server

4. Configure DHCP Scope
- Opened DHCP Manager (
dhcpmgmt.msc) - Created a new IPv4 Scope called
LabScope

-
Defined the following settings:
- IP Address Range: 192.168.56.110 – 192.168.56.200
- Subnet Mask: 255.255.255.0 (/24)

-
No exclusions were added
- Lease Duration: Default of 8 days

- Set Default Gateway: 192.168.56.1

5. DNS and Network Interface
-
Verified two IPs using
ipconfigdue to VM adapters:- NAT Adapter: 10.0.2.15
- Host-only Adapter: 192.168.56.101

- Set DNS Server to: 192.168.56.101
- Set Parent Domain to:
lab.local

- Scope setup completed successfully

6. DNS Zone Verification
- Opened DNS Manager
- Verified:
- Forward Lookup Zone:
lab.local - A Record Exists:
win-inhi2lp4vps → 192.168.56.101
- Forward Lookup Zone:

7. Client Configuration
-
On the Windows Client, confirmed adapter set to:
- Obtain IP address automatically

- Ran the following commands in Command Prompt:
ipconfig /release
ipconfig /renew
ipconfig /all
- Observed IP successfully received from DHCP scope

8. DNS Resolution Test
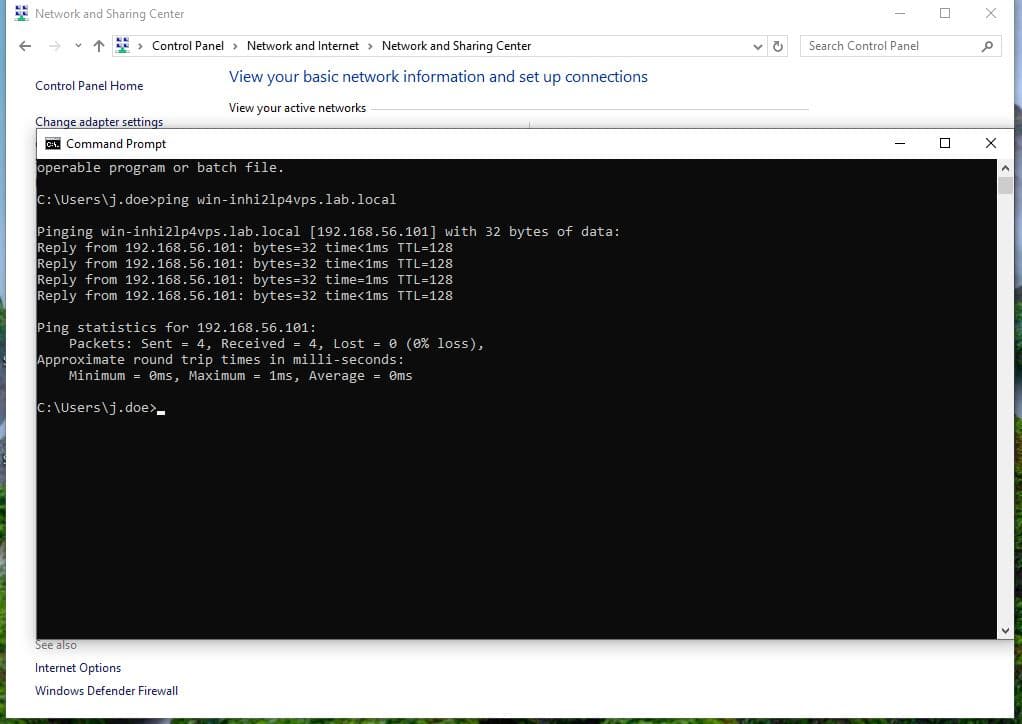
- Ran:
ping win-inhi2lp4vps.lab.local
- Result: ✅ Successfully resolved to
192.168.56.101
This confirms DNS resolution and network connectivity to the domain controller